
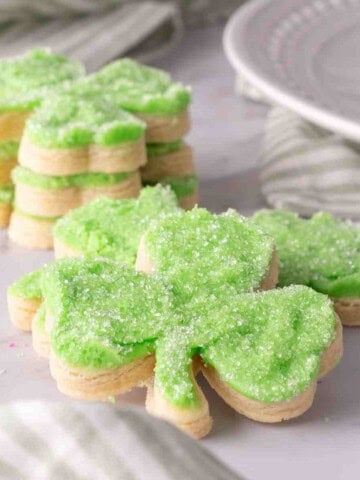
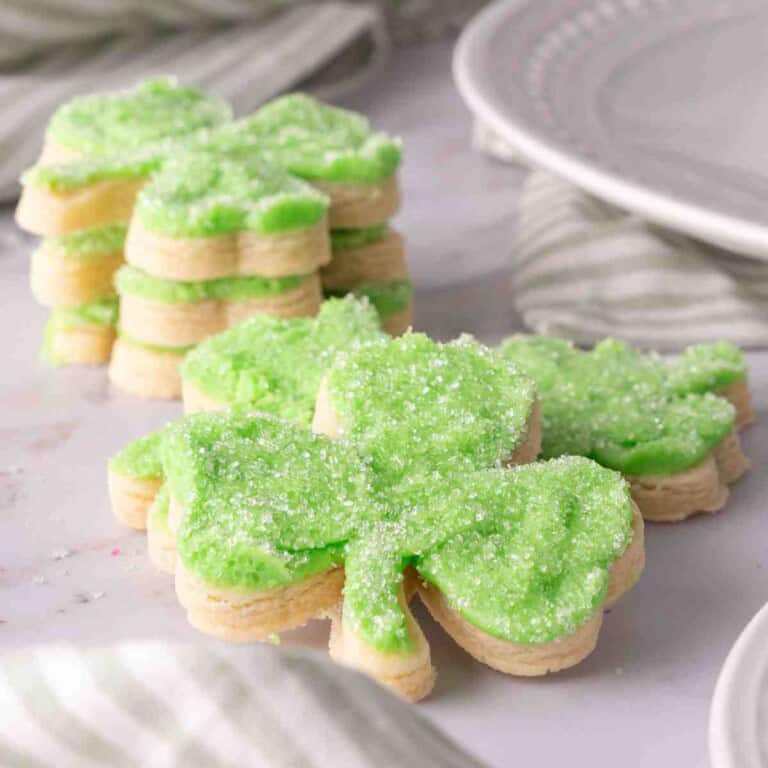
Celebrate Christmas with delicious Sugared Christmas Shortbread Cookies decorated with festive sugar. These Christmas cookies are based on bakery-style stamped shortbread cookies and add a pop of color for a cookie exchange or on cookie trays.
Need more holiday baking ideas? I've got a whole collection of Christmas cookie recipes worth adding to your list.

Jump to:
Why You'll Love These Sugared Christmas Shortbread Cookies
Simple to Make: You'll find it easy to create these cookies because they need only a few simple ingredients for the shortbread recipe. Just stamp them and bake!
Buttery Perfection: Like traditional shortbread, these cookies have a buttery flavor, are delicious, and have a crumbly texture.
Great for Christmas: Using festive stamps makes them a great sweet treat for sharing and a fun decorating activity.
Fun for the Holiday Season: You can use any cookie stamps and your favorite cookie cutters you want to make this simple recipe for cookies during Christmas time or other holidays.

Ingredients in Stamped Shortbread Cookies
- all-purpose flour
- cornstarch
- salt
- unsalted butter - use room temperature butter
- white sugar
- powdered sugar
- egg
- vanilla extract
See the recipe card for the full recipe and directions.

How to Make Sugared Shortbread Cookies
TIP: I use a rolling pin that has adjustable thickness rings to take the guesswork out of rolling the shortbread dough the same thickness.
- In a stand mixer fitted with a paddle attachment, beat butter until fluffy in a large bowl. Add white sugar and powdered sugar for about 3 minutes. The texture should be light in color and fluffy.
- Beat in the egg and vanilla extract.
- Combine the flour, cornstarch, and salt in a bowl.
- With the mixer on low speed, slowly add the dry ingredients to the sugar mixture. Stir just until combined; the dough will be soft.
- Divide the dough in half and shape it into two 8-inch round discs. Cover each disc with plastic wrap and chill the dough for 2 hours.
- Working with one disc at a time, place the chilled dough on a lightly floured surface and roll until it is ¼ inch thick using a rolling pin.
- Preheat the oven to 350ºF and line cookie sheets with parchment paper.
- Press the stamp into the dough. If you're using a plunger-style stamp, stamp the cookie first and then use the cutter to create a clean cut. Reroll any dough scraps and continue stamping cookies until no dough remains, being careful not to overwork the shortbread dough. Remember to dip the cookie stamps in flour and tap off any excess after each stamp.
- Place the stamped and cut-out cookies on the prepared baking sheet in the refrigerator for about 20 minutes while the oven preheats. Repeat the process with the second dough disc.
- Bake one cookie sheet at a time for 8 to 10 minutes or until the edges are set.
- Let them cool on the pan for 5 minutes before transferring to a wire rack to cool completely before adding the colored sugar.
- After the cookies have cooled, add water to a small bowl, dip a decorating brush into it, and use it to paint the stamped cookie where you want the colored sugar to go on top of the cookie. While the cookie is still wet, sprinkle sugar onto it and allow it to dry. Then, lightly brush away the excess sugar.
- Store in an airtight container.

Tips For Stamping Shortbread Cookies
Chill the Dough: Chill your cookie dough thoroughly before rolling it out. This will help the cookies maintain shape, prevent spreading, and preserve the indented designs. Chill the dough in the refrigerator for at least two hours or overnight for best results.
Use Flour on Stamps: Lightly dust your cookie stamps with flour before pressing them into the dough to prevent sticking and create a clean design. Shake off any excess flour to avoid leaving a white flour residue on the cookies.
Roll to the Right Thickness: Make sure the cookie dough is thick enough for the design to press clearly. I roll my dough out to ¼" thick. The cookies won't hold the stamp details if it's too thin.
Press Evenly: Apply even pressure on the stamp to avoid cracking the dough and ensure a clear impression.
Chill Before Baking: After cutting and stamping the cookies, chill them in the fridge for 20 minutes to help them retain their shape and stamp.
Difference Between Shortbread Cookies and Sugar Cookies
Shortbread cookies and sugar cookies are both popular treats but have some important differences. Shortbread cookies are known for their rich, buttery flavor and crumbly texture.
They are made with a high amount of butter and only a few ingredients and have a dense, melt-in-your-mouth quality.
On the other hand, sugar cookies are sweeter and have a lighter, more tender texture. They are also chewier cookies. Sugar cookies are also great for decorating with icing sugar, as they keep their shape well when baked, making them perfect for detailed designs and festive decorations.

Storing Shortbread Cookies
When storing Christmas shortbread cookies, use airtight cookie jars and containers or containers with tight-fitting lids to keep the cookies fresh.
For longer storage, you can freeze shortbread cookies. Individually wrap each cookie in plastic wrap or place parchment paper between layers of the completely cooled cookies and place them into a freezer-safe bag.
Store the bag in a freezer-safe container to prevent the cookies from getting crushed. Frozen cookies last up to 3 months when stored properly.

Christmas Cookie Recipes
Not only are these Christmas Shortbread Cookies great for the holiday season but these classic Cream Cheese Sugar Cookies are another colorful and delicious cookie to add to cookie trays.
Another festive cookie is these Christmas Cookie Butter Cookies - they're packed with delicious flavors of Biscoff cookies and have the colors of Christmas.
📖 Recipe

Sugared Christmas Shortbread Cookies
Equipment
Ingredients
- 2 ¾ cups all-purpose flour
- 3 tablespoons cornstarch
- ½ teaspoon salt
- 1 cup unsalted butter -room temperature
- ½ cup white sugar
- ½ cup powdered sugar
- 1 egg
- 1 teaspoon vanilla extract
- colored sugar for decorating
Instructions
- In a stand mixer fitted with a paddle attachment, beat butter until fluffy in a large bowl. Add white sugar and powdered sugar for about 3 minutes. The texture should be light in color and fluffy.
- Beat in the egg and vanilla extract.
- Combine the flour, cornstarch, and salt in a bowl.
- With the mixer on low speed, slowly add the dry ingredients to the sugar mixture. Stir just until combined; the dough will be soft.
- Divide the dough in half and shape it into two 8-inch round discs. Cover each disc with plastic wrap and chill the dough for 2 hours.
- Working with one disc at a time, place the chilled dough on a lightly floured surface and roll it with a rolling pin until it is ¼ inches thick.
- Preheat the oven to 350ºF and line cookie sheets with parchment paper.
- Press the stamp into the dough. If you're using a plunger-style stamp, stamp the cookie first and then use the cutter to create a clean cut. Reroll any dough scraps and continue stamping cookies until no dough remains, being careful not to overwork the shortbread dough. Remember to dip the cookie stamps in flour and tap off any excess after each stamp.
- Place the cut-out cookies on the prepared baking sheet and refrigerate them for about 20 minutes Repeat the process with the remaining dough.
- Bake one cookie sheet at a time for 8 to 10 minutes, or until the edges are set. Let the cookies cool on the pan for 5 minutes before carefully transferring them to a wire rack to cool completely before adding sugar.
- After the cookies have cooled, add water to a small bowl, dip a cake decorating brush into it, and use it to paint the stamped cookie.
- While the cookie is still wet, sprinkle sugar onto it and allow it to dry.
- Then, lightly brush away the excess sugar.
Notes
Nutrition
Nutritional information is an estimate based on third-party calculations. Actual values may vary due to ingredients, measurements, and serving sizes.
© Mama Needs Cake
Tried this recipe?
Let us know how it was!Dana is an experienced recipe creator who crafts easy and delicious recipes for all levels of home cooks.
Her recipes range from classic comfort foods to healthy and nutritious meals, and she is always on the lookout for new and exciting ways to bring flavor and variety to the table.


These cookies are delicious and held their shape beautifully after baking! Stashing this recipe away for all future cookie cutter/stamp needs. Thank you for posting!