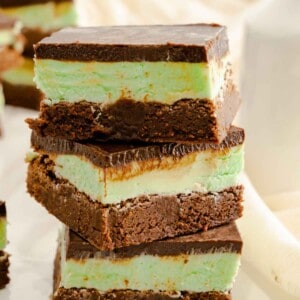
These mint chocolate brownies have a fudgy chocolate base, a creamy no-bake mint cheesecake middle, and a smooth chocolate ganache topping. Three layers, one pan, and they are the dessert I make whenever I want chocolate and mint in the same bite, from holiday trays to St. Patrick's Day.

A Mint Chocolate Brownie for Any Occasion
The bright green mint layer makes these a natural for St. Patrick's Day, but they are not a once a year recipe. The chocolate and mint combo works all through the holidays, and these hold up beautifully on a holiday dessert tray alongside my other brownies and cookie bars.
The center of these brownie bars is a creamy mint no-bake cheesecake filling. The middle layer needs a little chilling time so it can set and become firm, but it is worth the wait.
Chocolate ganache spreads over the top of the brownies, then goes back in the fridge so it firms up before slicing.
If you want the fudgier, no-cheesecake version, try my chewy mint chocolate brownies.

Ingredients in Mint Chocolate Brownies
Here is the list of ingredients you need to make these mint chocolate brownies. The full detailed list with amounts is in the recipe card at the bottom of this post.
- Unsalted Butter - used in all three layers of the brownie bars
- Cream Cheese - for the middle layer
- Heavy Cream - used in the middle layer and the ganache layer
- Confectioner's Sugar - added into the cheesecake layer
- Mint Extract - used to flavor the cheesecake filling
- Granulated Sugar
- Cocoa Powder - for the brownie layer
- Vanilla Extract
- Salt
- Eggs
- Dark Chocolate - used in the brownie layer and the ganache.
- Green food coloring - to give color to the cheesecake filling

How to Make Mint Chocolate Brownie Layers
- Start with the brownie layer. The brownie batter comes together fast, so this layer is straightforward.
- Butter and chocolate melt in a saucepan, then come off the heat. The rest of the ingredients blend together, and the melted chocolate mixture gets combined in as well.
- Spread the batter into a prepared 8x8 dish greased and lined with parchment paper, which makes it easy to lift the bars out later.
- Bake the brownie layer for 30 minutes, then let it cool for one hour.
- Once the hour is up, make the mint cheesecake filling. Room temperature ingredients make this much easier and quicker.
- Start with a small amount of green food coloring and add more until you reach the shade you want. You can skip the food coloring entirely and the mint cheesecake layer will still taste the same.

I have made these enough times to know the little things that matter, so here is what I do.
A Few Things That Make These Turn Out Right
Let each layer cool before you add the next one, otherwise the layers melt into each other and you lose that clean stripe.
Run a knife under hot water, wipe it dry, and then slice, it gives you the cleanest bars.
Keep them in the fridge, and pull them out a few minutes before serving so the ganache softens just enough to bite.
Add the green food coloring a tiny bit at a time, or skip it, the mint cheesecake layer tastes the same either way.

Your Mint Chocolate Brownie Questions
Can I make these mint brownies ahead of time?
Yes. These mint brownies keep well in the fridge for several days, so you can make them a day or two ahead. The layers actually slice cleaner once they have fully chilled.
Do you have to refrigerate mint chocolate brownies?
Yes. The mint cheesecake layer and the ganache both need to stay cold to hold their texture, so keep them in the refrigerator in an airtight container. They will keep for several days, and they slice cleanest when they are fully chilled.
Why did my mint cheesecake layer turn runny?
Usually because the brownie layer was still warm when you spread the cheesecake on top, or the cheesecake did not chill long enough before the ganache went on. Let each layer cool completely before adding the next.
📖 Recipe
Mint Chocolate Brownies
Equipment
Ingredients
Brownie Layer
- ½ cup butter - unsalted, sliced into pats
- 4 oz dark chocolate bar
- 2 eggs
- 1 cup granulated sugar
- ¼ cup cocoa powder
- 1 teaspoon vanilla extract
- ¼ teaspoon salt
- ¾ cup all purpose flour
Mint Layer
- 2 tablespoon butter - unsalted, softened
- 3 oz cream cheese - softened
- ¼ teaspoon mint extract
- 3 tablespoon heavy cream
- 3 cups confectioner's sugar
- Green food coloring
Ganache Topping
- ⅓ cup heavy cream
- 1 ⅓ cup dark chocolate chips
- 2 tablespoon butter - unsalted
Instructions
Brownie Layer
- Preheat the oven to 350°F
- Grease and line an 8x8 baking dish with parchment paper.
- In a saucepan over medium-low heat, melt the dark chocolate bar and the butter. Stir until completely melted and remove from heat.
- Combine the granulated sugar, eggs, cocoa powder, vanilla extract, and salt together in a bowl.
- Add in the all-purpose flour as well as the cooled melted chocolate mixture.
- Mix until all ingredients are combined.
- Transfer to the prepared baking dish and bake for 30 minutes.
- Remove from the oven and allow it to cool for one hour.
Mint Layer
- Combine the softened butter and the cream cheese together until creamy.
- Add in the heavy cream and mint extract.
- Beat in the confectioner's sugar a little at a time.
- Add the green food coloring a little at a time until the desired color is reached.
- Transfer the filling to the brownie dish.
- To make spreading easier, cover with parchment paper and use a small glass to roll from the center outwards.
- Continue smoothing the layer until it is evenly layered on the brownie layer.
- Place in the refrigerator for 1 hour before topping with the ganache.
Ganache Layer
- Heat the 2 tablespoons of butter and the heavy cream on the stovetop in a small saucepan.
- Add the dark chocolate chips and stir to combine.
- Remove from the heat and stir to help the chocolate chips melt.
- Allow the ganache to sit for 15 minutes before pouring over the mint filling.
- Once the ganache has cooled for 15 minutes, carefully and evenly pour the mixture on top of the middle layer.
- Give the baking dish a little shake to help create an even layer.
- Place back in the refrigerator for 1 hour before slicing.
Notes
- When layering, ensure that the layer you are adding to is cool. If not, the layers will melt into each other.
- Use a hot or wet knife to slice the bars for cleaner cuts.
- Store in the refrigerator for maximum freshness and flavor.
Nutrition
Nutritional information is an estimate based on third-party calculations. Actual values may vary due to ingredients, measurements, and serving sizes.
© Mama Needs Cake
Tried this recipe?
Let us know how it was!Dana is an experienced recipe creator who crafts easy and delicious recipes for all levels of home cooks.
Her recipes range from classic comfort foods to healthy and nutritious meals, and she is always on the lookout for new and exciting ways to bring flavor and variety to the table.